This post helps you create radio buttons in Google Sheets using Google Apps Script. It covers how to add this radio buttons feature both horizontally and vertically.
Google Sheets is a powerful tool that allows us to manage and manipulate data.
However, there are times when we may need to extend its functionality to better suit our needs. One such case is the need to create radio boxes in Google Sheets.
Radio boxes, also known as radio buttons, are graphical control elements that allow users to choose only one of a predefined set of mutually exclusive options.

Let’s consider an example. Suppose you’re managing a database of team members in a Google Sheet and you need to assign roles to each member. The roles could be “Manager”, “Team Lead”, or “Senior “. The radio button feature would be ideal for this situation because it would let you select only one role for each member, thus preventing any role assignment errors. Here is a sneak peek of what the final result will look like.
Radio boxes in Google Sheets can be beneficial in several ways:
- They can help ensure data consistency by allowing only one selection from a list of options.
- They can improve user experience by providing a clear visual indication of choices.
Contrary to checkboxes, Google Sheets does not have built-in radio buttons to be inserted directly. But no worries! We can use Google Apps Script and checkboxes to create this feature.
In this blog post, I will guide you through a step-by-step tutorial on how to create radio boxes in Google Sheets using Google Apps Script. I will also provide the full Google script required to enable this feature horizontally (in rows) or vertically (in columns).
1. Two approaches to radio buttons
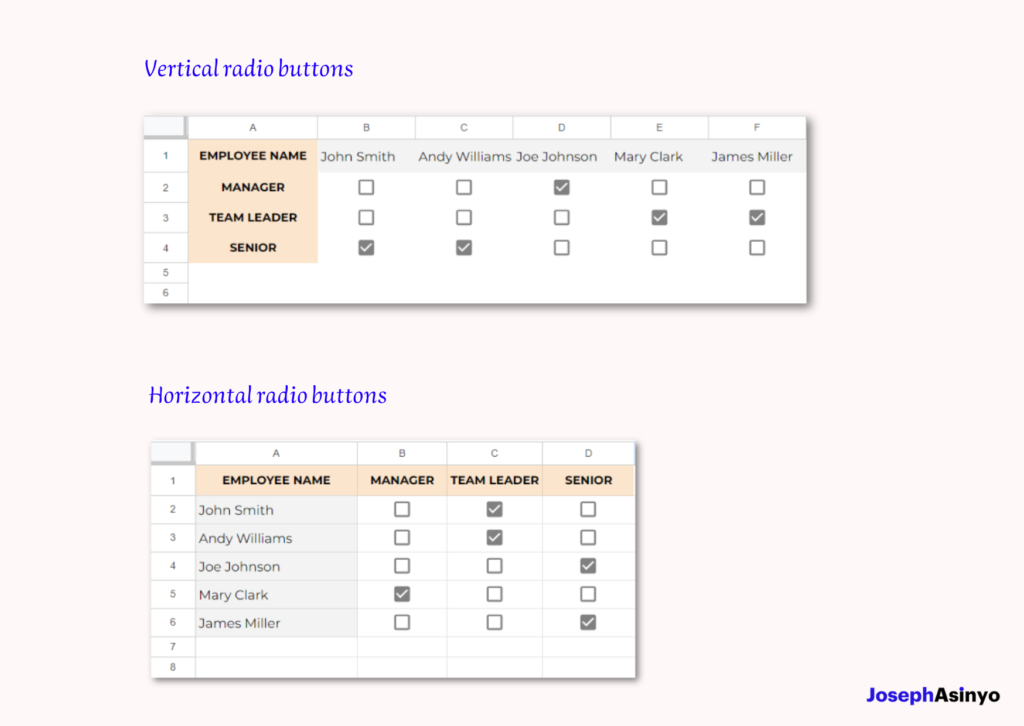
When we talk about creating a radio button feature in Google Sheets, we can approach it in two ways: vertically or horizontally. The vertical radio button approach means that only one checkbox can be selected in a given column at a time. On the other hand, the horizontal radio button approach implies that only one checkbox can be selected in a given row at any moment.
2. Open your spreadsheet
First, get a copy of the sample spreadsheet that already contains the required code. In this case, you only need to open the code editor and remove either the Horizontal radio buttons block of code or the Vertical radio buttons one, according to what you need. Then the sheet will be ready for you to test the new feature.
But if you want to use this feature in one of your Google sheets, then go to step 3 or 4.
3. Creating horizontal radio buttons
We will need to add to our spreadsheet the Google script that will enable this radio button functionality. After creating the layout of the checkboxes as shown in the image above, open the code editor of the Google Sheet by clicking on Extensions > Apps Script. Then replace the content of the code.gs file with the following script.
/**
 * Horizontal radio buttons
 */
const RADIO_COLUMNS = ["B","C","D"];

function onEdit(e) {
  // Get event object data: sheet name, row number and column number
  const sheet = e.range.getSheet();
  const row = e.range.rowStart;
  const col = e.range.columnStart;
  const val = sheet.getRange(row,col).getValue()

  // Convert column number to column letter
  const colLetter = String.fromCharCode(64 + col);

  if (val == true && RADIO_COLUMNS.includes(colLetter)) {
    RADIO_COLUMNS.filter(column => column !== colLetter)
      .forEach(column => sheet.getRange(column + row).uncheck());
  }
}
You need to specify in the RADIO_COLUMNS array the columns where you want to apply the radio button functionality. In our example, our options “Manager”, “Team Lead”, and “Senior ” are contained in columns “B”, “C”, and “D”, respectively. The function dynamically adapts to the columns specified in the RADIO_COLUMNS array, so feel free to change and customize it as per your need.
Here is what happens behind the scenes. When an edit event happens in the sheet, the onEdit function is triggered. The function first retrieves the sheet, the row number, and the column number of the edited cell. It then checks the value of the edited cell to ensure that a checkbox has been checked (val == true).
The function also checks whether the column of the edited cell is included in the RADIO_COLUMNS array. If both conditions are met, it implies that a checkbox in one of the specified columns has been checked.
The function then takes the RADIO_COLUMNS array and filters out the column of the checked checkbox. This leaves an array of columns that did not receive the edit. The function then iterates over these remaining columns and unchecks any checkboxes in the same row. This ensures that only one checkbox can be checked in the given row across the specified columns.
4. Creating vertical radio buttons
The function to enable this feature works similarly to the first one, but this time it’s designed to mimic the radio button feature vertically. The RADIO_ROWS array contains the row numbers where you want to apply the radio button functionality. Here as well you need to customize this array as you want. In our example, the rows to include are rows 2, 3, and 4 (see the image in point 1).
/**
 * Vertical radio buttons
 */
const RADIO_ROWS = [2,3,4];

function onEdit(e) {
  // Get event object data: sheet name, row number and column number
  const sheet = e.range.getSheet();
  const row = e.range.rowStart;
  const col = e.range.columnStart;
  const val = sheet.getRange(row,col).getValue()

  if (val == true && RADIO_ROWS.includes(row)) {
    RADIO_ROWS.filter(r => r !== row)
      .forEach(r => sheet.getRange(r, col).uncheck());
  }

}
The function checks if a checkbox in one of the specified rows (defined in the RADIO_ROWS array) has been checked. If so, it unchecks any other checkboxes in the same column. This ensures that only one checkbox in a given column for the specified rows can be checked at a time.
Congratulations! You have now learned how to create radio boxes in Google Sheets using Google Apps Script. This feature can be very useful for enhancing the functionality and user-friendliness of your spreadsheets. Remember, the key to mastering Google Apps Script is practice and experimentation, so don’t hesitate to modify the scripts and see what you can create. Happy coding!

Joseph Asinyo
Google Workspace Developer
I’m Joseph. I love building applications and writing Google scripts to automate Google Workspace for greater productivity. Learn more about me.