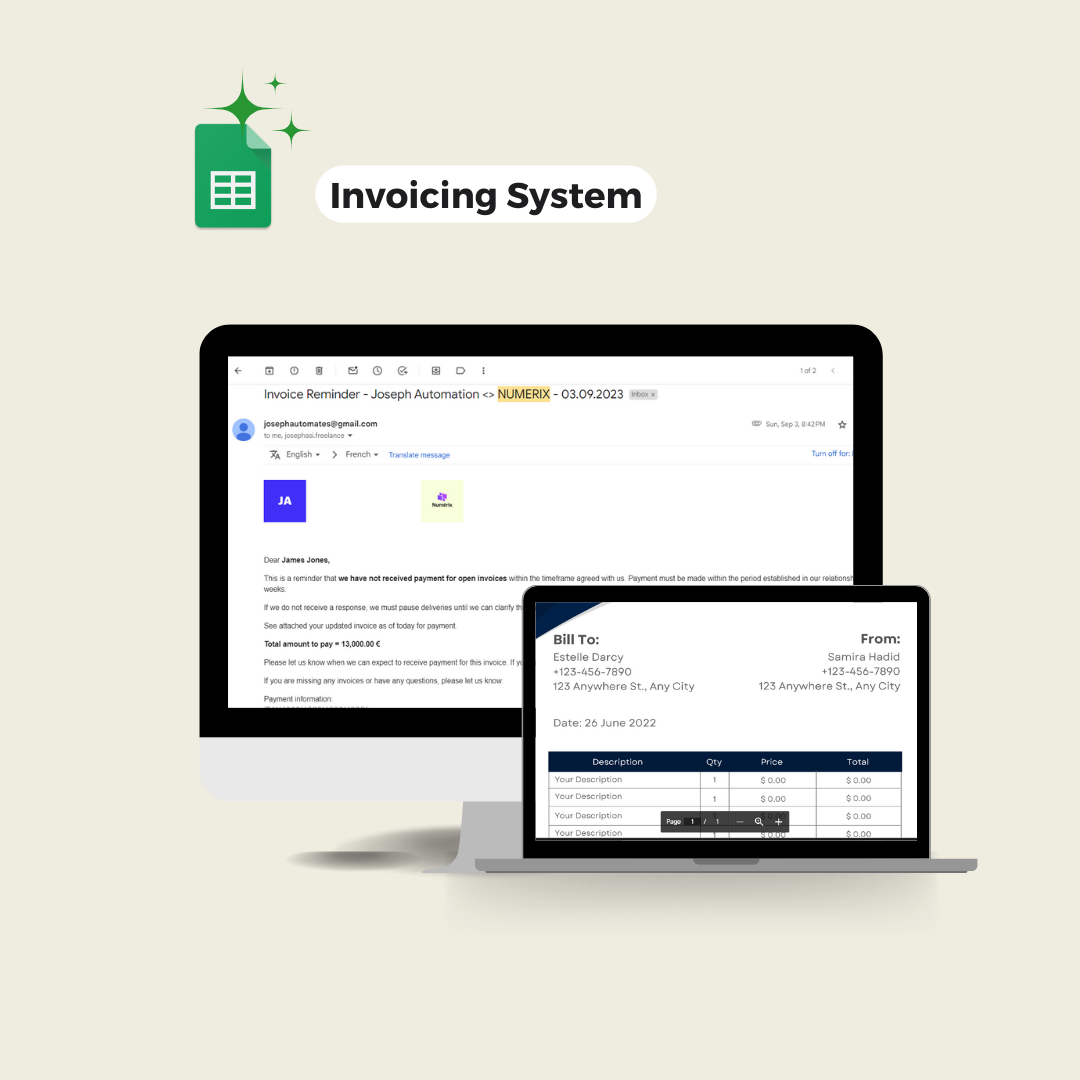
Learn how to automatically send invoice documents from Google Sheets and send payment reminder emails using Google Apps Script.
I worked with a company that operates in the food industry, providing a delivery service for fruits and vegetables to both individuals and other businesses in the same sector. Given the number of clients they serve, the company was keen on improving their productivity and efficiency. One of the ways they aimed to achieve this was by automating their invoicing system. The goal was to ensure that with less effort, invoices were sent to customers promptly and reminders dispatched where necessary.
This situation isn’t unique to this company. Many businesses struggle with manual invoice management, which not only consumes valuable time but also increases the risk of errors. Automation is a solution that can streamline the invoicing process, making it more efficient and less prone to mistakes.
In this blog post, I will guide you through the process of automating the sending of invoices to clients from a Google Sheet using Google Apps Script, a powerful tool that can help businesses like the one mentioned above to improve their productivity.
1. Preparing Your Google Sheets
You can use the preformatted sample Invoicing System that already contains this layout and the required code. In this case, go to step 4 to continue the tutorial.
In case you want to integrate the invoicing system into an existing spreadsheet, then you need to insert the script into it. First, create two new sheets within your Google Sheet. The first should be named “Clients Data“, which will hold all the necessary client information. The second sheet should be titled “Settings“, and will contain your business logo.
In the “Clients Data” sheet, input the following column headers: COMPANY, EMAILS, CORRESPONDENT NAME, AMOUNT, PAYMENT PERIOD, INVOICE, and CLIENT LOGO. Each subsequent row should contain the corresponding data for each client. Note that both the client logo and the invoice should be uploaded to your Google Drive, and their respective links should be inserted into the sheet.
2. Adding the Google Script
Once your sheets are correctly filled, you need to integrate the Google Apps Script. Navigate to the script editor by clicking on Tools in the menu, then Script editor. Paste the provided script into the code.gs file.
// Get active spreadsheet and specific sheets
const ss = SpreadsheetApp.getActive()
const email_aut_sh = ss.getSheetByName("Client data")
const settings_sh = ss.getSheetByName("Settings")


// Function that runs when the spreadsheet is opened
function onOpen() {
  // Creates a new menu in the toolbar
  SpreadsheetApp.getUi()
    .createMenu('🪄Custom Functions')
    .addItem('Send Invoices', 'sendInvoices') // Adds an item to the menu that runs the 'sendInvoices' function
    .addToUi();
}


// Function to send invoices
function sendInvoices(){
  // Shows a toast message saying the function is running
  SpreadsheetApp.getActive().toast("", "🧫 Running...",  -1);

  // Get all the data from the 'Client data' sheet
  var clients = email_aut_sh.getRange(1,1,email_aut_sh.getLastRow(),email_aut_sh.getLastColumn()).getDisplayValues()
  // Separate the headers from the data
  var headers = clients.shift()
  // Convert the array of arrays into an array of objects
  var clients_objects = getclientsObjects(clients, headers)

  // Get the current date and format it
  var date = new Date()
  var formatted_date = Utilities.formatDate(date, "GMT", "dd.MM.yyyy")

  // Get the URL of our logo from the 'Settings' sheet and convert it into a blob
  var our_logo_url = settings_sh.getRange("A2").getValue()
  var our_logo_blob = getFileBlob(our_logo_url)

  // Loop through each client
  for(var i=0; i<clients_objects.length; i++){

    var client = clients_objects[i]

    // If neither the 'send 1st email' nor 'send reminder' checkbox is checked, skip this client
    if(client.send1stEmail !== "TRUE" && client.sendReminder !== "TRUE") continue;

    // Extract the email addresses from the 'emails' field
    var emails = getEmails(client.emails)

    // If there are email addresses, prepare the email data
    if(emails.length != 0){

      var data = {
        client: client,
        invoice_blob: getFileBlob(client.invoice),
        our_logo_blob: our_logo_blob
      }

      // If the 'send 1st email' checkbox is checked, send the first email
      if(client.send1stEmail === "TRUE"){
        var subject = "Invoice - Joseph Automation <> "+client.company +" - "+formatted_date
        var email_template = "1st Email";
        data["client_logo_blob"] = getFileBlob(client.clientLogo);
        sendEmailWithAttachment(data, emails, subject, email_template)
        email_aut_sh.getRange("J"+(i+2)).setValue(date)

      // If the 'send reminder' checkbox is checked, send the reminder email
      } else if(client.sendReminder === "TRUE"){
        var subject = "Invoice Reminder - Joseph Automation <> "+client.company +" - "+formatted_date
        var email_template = "Reminder Email";
        data["client_logo_blob"] = getFileBlob(client.clientLogo);
        sendEmailWithAttachment(data, emails, subject, email_template)
        email_aut_sh.getRange("J"+(i+2)).setValue(date)
      }
    }
  }

  // Shows a toast message saying the function has completed
  SpreadsheetApp.getActive().toast("", "✅ Completed");
}


// Function to extract the file ID from a Google Drive URL
function extractDriveFileId(url) {
  var match = url.match(/\/file\/d\/([^\/]+)/);
  if (match && match[1]) {
    Logger.log(match[1])
    return match[1];
  } else {
    return null;
  }
}


// Function to get the blob of a file from Google Drive
function getFileBlob(logo_url){
  var logo_id = extractDriveFileId(logo_url)
  try{
    var logo_file = DriveApp.getFileById(logo_id)
    var logo_blob = logo_file.getBlob()
    return logo_blob;
  } catch {
    return null;
  }
}


// Function to extract email addresses from a string
function getEmails(inputString) {
  var emailPattern = /[^\s@]+@[^\s@]+\.[^\s@]+/g;
  var matches = inputString.match(emailPattern);
  if (matches) {
    matches = matches.map(function(email) {
      return email.replace(/[,;]$/, '');
    });
    console.log(matches)
    return matches;
  }
  return [];
}


// Function to send an email with an attachment
function sendEmailWithAttachment(data, receivers_emails, subject, email_template) {
  // Create an HTML template from the provided file
  var template = HtmlService.createTemplateFromFile(email_template);
  // Assign the data to the template
  template.data = data;
  // Evaluate the template and get the content
  var htmlBody = template.evaluate().getContent();
  var inline_images = {}

  // If we have blobs for our logo and the client logo, add them to the inline_images object
  if(data.our_logo_blob) inline_images["our_logo"] = data.our_logo_blob;
  if(data.client_logo_blob) inline_images["client_logo"] = data.client_logo_blob;

  // Send the email with the HTML body and inline images
  MailApp.sendEmail({
    to: receivers_emails.join(','),
    subject: subject,
    htmlBody: htmlBody,
    inlineImages: inline_images,
    attachments: [data.invoice_blob]
  });
}


// Function to convert the array of arrays into an array of objects
function getclientsObjects(clients, headers){
  var clients_objects = []
  var formatted_headers = formatHeadersToCamelCase(headers)
  for(var i=0; i<clients.length; i++){
    var client_obj = {}
    for(var j=0; j<headers.length; j++){
      if(!headers[j]) continue;
      client_obj[formatted_headers[j]] = clients[i][j]
    }
    clients_objects.push(client_obj)
  }
  return clients_objects;
}


// Function to convert the headers to camelCase
function formatHeadersToCamelCase(headers) {
  var formattedHeaders = [];
  for (var i = 0; i < headers.length; i++) {
    var header = headers[i];
    var words = header.replace(/[^\w\s]/g, '').split(/\s+/);
    var camelCaseHeader = words.map(function(word, index) {
      if (index === 0) {
        return word.toLowerCase();
      }
      return word.charAt(0).toUpperCase() + word.slice(1).toLowerCase();
    }).join('');
    formattedHeaders.push(camelCaseHeader);
  }
  return formattedHeaders;
}
3. Creating HTML Files for Emails
Next, create an HTML file named 1st Email and paste the corresponding email template into this file.
<!DOCTYPE html>
<html>
  <head>
    <base target="_top">

    <style>
      span {
        display: block;
      }
      table {
        text-align: center;
      }
      td {
        padding-top: 5px;
        padding-bottom: 5px;
        padding-left: 10px;
        padding-right: 10px;
      }
      .full-image {
        width: 75px;
        height: auto;
      }
    </style>

  </head>
  <body>

    <div style="margin-top: 20px; margin-botton: 70px">
      <? if(data.our_logo_blob){ ?>
        <img src="cid:our_logo" class="full-image" alt="Image" style="margin-right: 200px;" />
      <? } ?>

      <? if(data.client_logo_blob){ ?>
        <img src="cid:client_logo" class="full-image" alt="Image" />
      <? } ?>
    </div>

    <br><br>

    <p>Dear <b><?= data.client.correspondantName ?>,</b></p>
    <p>Hope you are doing great. Please see attached your updated invoice as of today awaiting your payment.</p>
    <p> <b>Total amount to pay = <?= data.client.amount ?> </b> </p>
    <p>If you are missing any invoices or have any questions, please let us know.</p>

    <p>
      <span>Payment information:</span>
      <span>IBAN XXXX XXXX XXXX XXXX</span>
      <span>We would appreciate proof of payment sent to contact@josephasinyo.com</span>
      <span>If you already paid this balance, please ignore this email.</span>
      <span>Kind regards,</span>
      <span>Joseph Automation</span>
    </p>

    <br>

  </body>
</html>
Repeat this process for a second HTML file named Reminder Email, using the reminder email template.
<!DOCTYPE html>
<html>
  <head>
    <base target="_top">

    <style>
      span {
        display: block;
      }
      table {
        text-align: center;
      }
      td {
        padding-top: 5px;
        padding-bottom: 5px;
        padding-left: 10px;
        padding-right: 10px;
      }
      .full-image {
        width: 75px;
        height: auto;
      }
    </style>

  </head>
  <body>

    <div style="margin-top: 20px; margin-botton: 70px">
      <? if(data.our_logo_blob){ ?>
        <img src="cid:our_logo" class="full-image" alt="Image" style="margin-right: 200px;" />
      <? } ?>

      <? if(data.client_logo_blob){ ?>
        <img src="cid:client_logo" class="full-image" alt="Image" />
      <? } ?>
    </div>

    <br><br>

    <p>Dear <b><?= data.client.correspondantName ?>,</b></p>
    <p>This is a reminder that <b>we have not received payment for open invoices</b> within the timeframe agreed with us. Payment must be made within the period established in our relationship, <?= data.client.paymentPeriod ?>.</p>
    <p>If we do not receive a response, we must pause deliveries until we can clarify the reasons for these delays. Please contact us and make your payment as soon as possible.</p>
    <p>See attached your updated invoice as of today for payment.</p>
    <p> <b>Total amount to pay = <?= data.client.amount ?> </b> </p>
    <p>Please let us know when we can expect to receive payment for this invoice. If you have any queries, don’t hesitate to let us know. You can find the original invoice attached.</p>
    <p>If you are missing any invoices or have any questions, please let us know.</p>

    <p>
      <span>Payment information:</span>
      <span>IBAN XXXX XXXX XXXX XXXX</span>
      <span>We would appreciate proof of payment sent to contact@josephasinyo.com</span>
      <span>If you already paid this balance, please ignore this email.</span>
      <span>Kind regards,</span>
      <span>Joseph Automation</span>
    </p>

    <br>

  </body>
</html>
Of course, you can modify the emails’ content the way you like. Just make sure you keep the HTML tags.
4. Running the Script
After completing these steps, refresh your spreadsheet. A new menu item named Custom Functions should appear in the toolbar. This menu contains the Send invoices function, which when clicked, triggers the Google Script to send the invoices to clients.
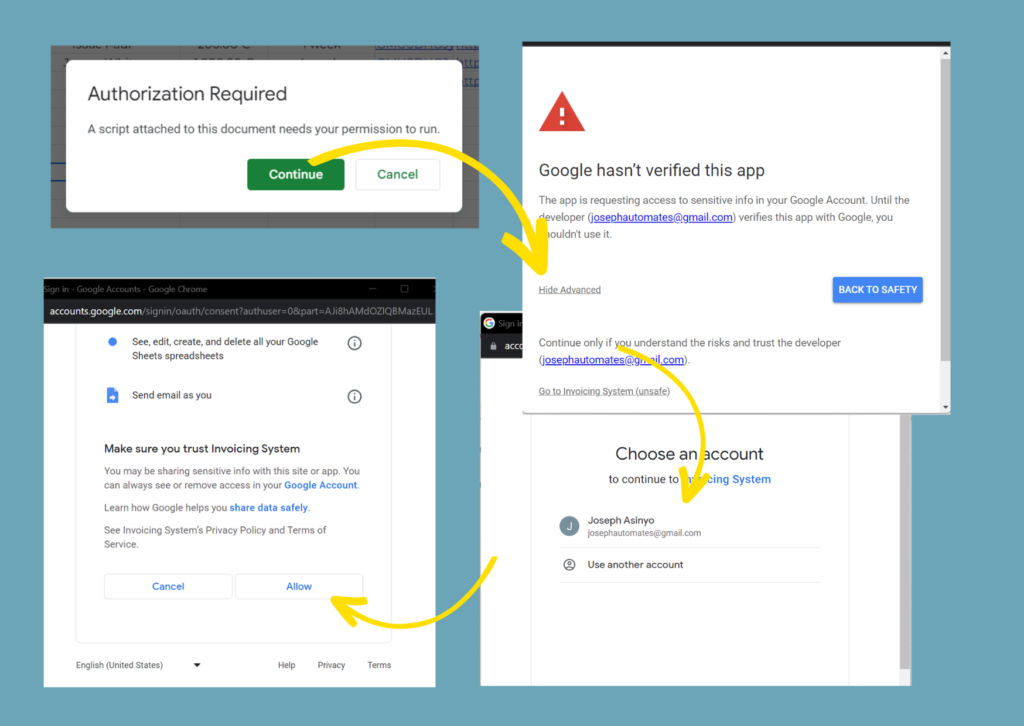
The first time you run this function, you will be prompted to grant certain permissions. Follow the prompts and grant the necessary permissions to Google, as shown in the image below.
5. Using the automation tool
With permissions granted, you’re now ready to use this automated invoicing tool. Depending on whether you want to send the initial invoice email or the payment reminder email, check the appropriate box and click “Send invoices” from the “Custom Functions” menu. Note that if both boxes are checked, only the first email will be sent.
Congratulations! You’ve successfully automated the process of sending invoices from a Google Sheet using Google Apps Script. This tool will help save time and increase your business’s productivity. Remember to keep your Clients Data sheet updated to ensure the correct invoices are sent to the appropriate clients.

Joseph Asinyo
Google Workspace Developer
I’m Joseph. I love building applications and writing Google scripts to automate Google Workspace for greater productivity. Find more about me.